As our business expanded, we needed a high-availability solution for our SQL databases to ensure reliability and disaster recovery. Initially, we relied on SQL Server Mirroring, which provided redundancy at the database level. However, as our infrastructure expanded, we faced multiple challenges that made mirroring increasingly difficult to manage. Eventually, at the end of 2018, we decided to transition to SQL Server Clustering, which offered better scalability and stability.
So what are the reasons that drove us to change from mirroring to clustering?
Growing Number of Databases and Management Overhead
In SQL Mirroring, each database requires an individual mirroring setup. While this worked well initially, as our business expanded and the number of databases increased, this approach created significant administrative overhead. For example:
Manual Configuration: Setting up mirroring for each new database required manual intervention, which was time-consuming and prone to human error.
Monitoring Complexity: Monitoring the health and synchronization status of multiple mirrored databases became increasingly challenging as the number of databases grew.
Resource Consumption: Each mirrored database consumed additional resources, such as network bandwidth and storage, which added up as the number of databases increased.
In contrast, SQL Clustering operates at the instance level, allowing us to manage multiple databases under a single umbrella. This significantly reduced the administrative burden and streamlined our operations.
Inability to Mirror System Databases
One of the most critical limitations of SQL Mirroring was its inability to mirror system databases (e.g., master, msdb, model, and tempdb). These databases play a vital role in our operations:
Email and Reporting: We rely on the msdb database for SQL Server Agent jobs, which handle tasks like sending emails and generating reports.
Centralized Configuration: The master database stores server-wide configuration settings, logins, and other critical metadata.
Without the ability to mirror system databases, we were forced to rely on a single server for these essential functions. This created a single point of failure, which was unacceptable for our business continuity and disaster recovery plans. SQL Clustering, on the other hand, provides high availability for the entire SQL Server instance, including system databases, ensuring seamless failover and minimal downtime.
Additional Challenges with SQL Mirroring
Beyond the two main reasons, we faced several other practical disadvantages with SQL Mirroring:
Limited Failover Capabilities: SQL Mirroring requires manual intervention for failover in some configurations (e.g., high-performance mode), which can lead to extended downtime during outages.
No Readable Secondary Database: Unlike SQL Clustering or Always On Availability Groups, SQL Mirroring does not allow the secondary database to be used for read-only operations, limiting our ability to offload reporting workloads.
Network Dependency: Mirroring relies heavily on a stable and high-bandwidth network connection. Any network issues could disrupt synchronization, leading to potential data loss or delays.
Deprecation Concerns: Microsoft announced the deprecation of SQL Mirroring in favor of newer technologies like Always On Availability Groups. This made it clear that continuing with mirroring would not be a sustainable long-term solution.
Why SQL Clustering Was the Right Choice
SQL Clustering addressed many of the limitations we faced with SQL Mirroring:
Instance-Level High Availability: Clustering provides failover capabilities at the instance level, ensuring that all databases, including system databases, are protected.
Simplified Management: With clustering, we no longer needed to configure and monitor individual database mirrors, reducing administrative overhead.
Improved Resource Utilization: Clustering allows for better resource allocation and scalability, which is essential as our database environment continues to grow.
Future-Proofing: By adopting SQL Clustering, we aligned ourselves with modern high-availability solutions, ensuring compatibility with future SQL Server updates and features.
Mirroring had become challenging to maintain due to our growing number of databases, lack of system database mirroring, and various performance and management drawbacks. The deprecation of mirroring and the need for a scalable and resilient solution led us to migrate to SQL Server Clustering. SQL Clustering has since proven to be a reliable and efficient choice, enabling us to maintain high availability, streamline management, and support our expanding operations. Yes, SQL clustering is more expensive than Mirroring, but the benefit it brings is worth the extra cost.
The big corporations require solid authentication solutions to ensure secure and seamless access to their applications. Single sign-on plays a crucial role in maintaining data security while providing users with a smooth experience in accessing the platform. For one of our clients who is a large enterprise with 30,000 employeesin 13 different countries, we were tasked to implement a Single Sign-On (SSO) solution to streamline access to a custom application developed by us for them.
The client’s environment relied heavily on Microsoft technologies. We also hosted the application in a Windows environment, so using Active Directory Federation Services (ADFS) was the ideal choice for this process. ADFS not only integrates seamlessly with Microsoft ecosystems but also provides a robust and scalable platform for authentication.
To ensure the solution met the client’s needs, I began with a Proof of Concept (PoC) using ADFS 4.0 on Windows Server 2016 to replicate the client environment. This allowed for validation of the technical feasibility and performance of the solution before full-scale deployment. The authentication mechanism was built on SAML (Security Assertion Markup Language), a widely adopted standard for SSO that ensures secure and interoperable communication between the identity provider (ADFS) and the custom application.
Proof of Concept (PoC)
First, we needed to establish that the proposed process would work with the custom-built application. So, I conducted a Proof of Concept (PoC) to validate the solution. Here’s how I approached it:
Setup an ADFS environment
The first thing that I needed was a replica of our client environment. So, I fired up an old server and deployed ADFS 4.0 on Windows Server 2016 with active directory. As our client uses Windows 2016 with ADFS 4.0, I installed the same software on the machine.
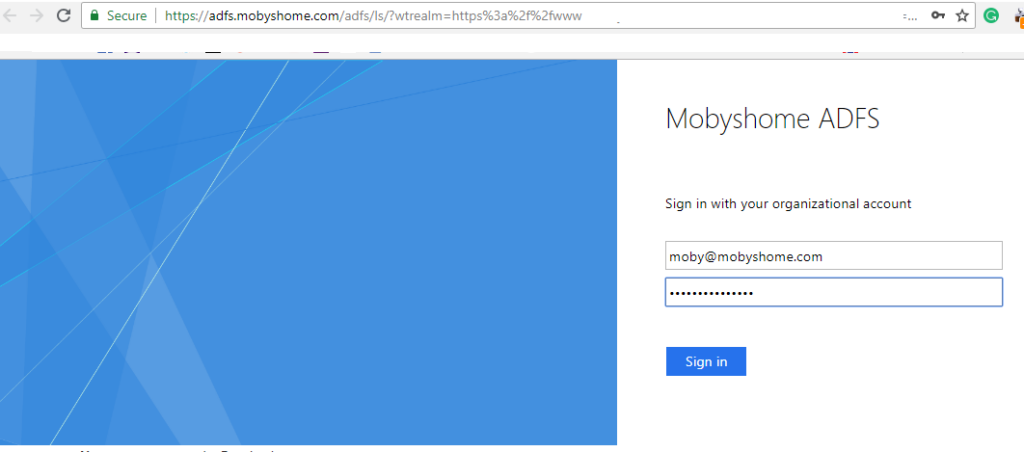
Setting up the ADFS requires a fully qualified domain name. So, I used one of my domains to set up the ADFS name(adfs.mobyshome.com). I quickly organised an SSL certificate for the domain as well.
Once everything was set, the domain was ready for single sign-on via ADFS.
SAML Configuration
I Exported the ADFS metadata and shared it with the application team for integration.
Then worked with the team to configure the application to consume SAML assertions from ADFS
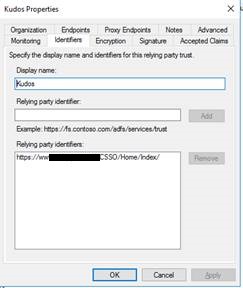
The next task was to Register the custom application as a Relying Party Trust (RP Trust) in ADFS.
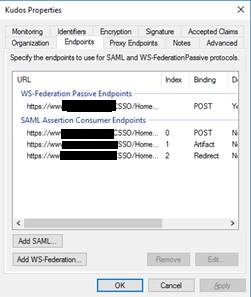
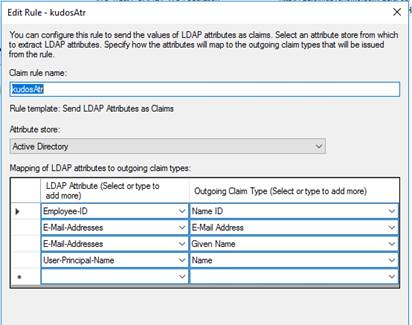
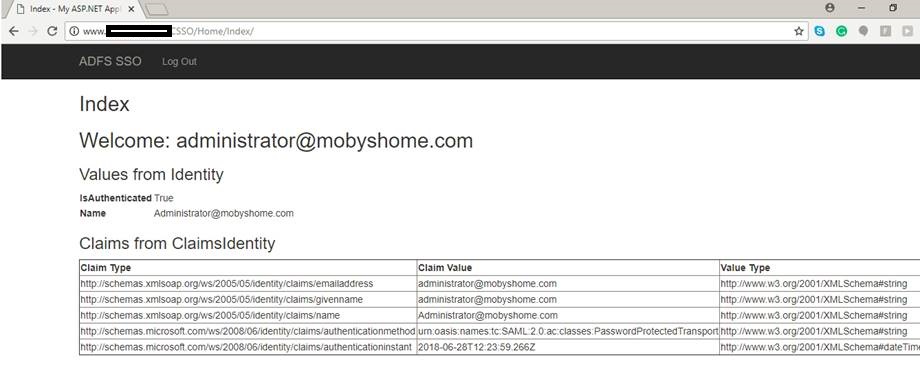
And finally configure the SAML endpoints and claims rules to map user attributes (e.g., email, username) to the application.
Testing
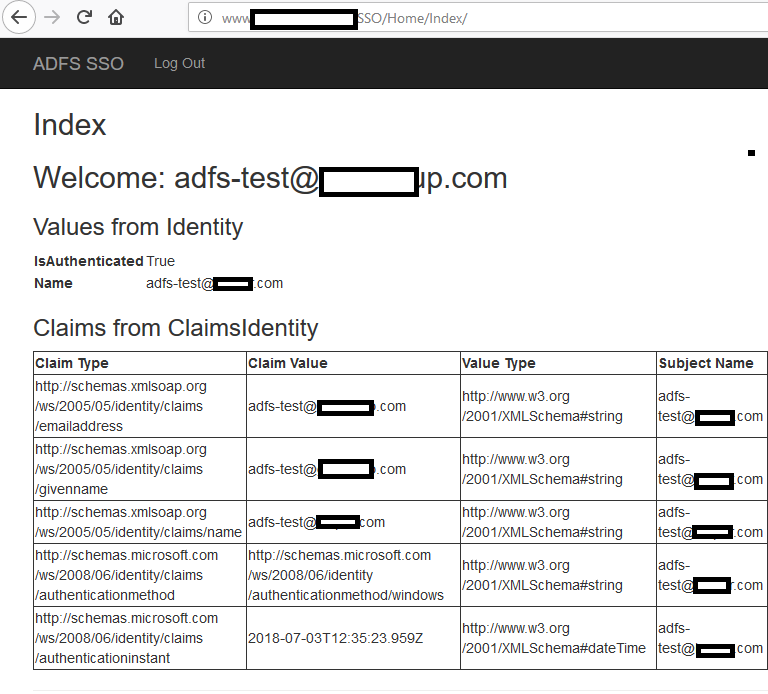
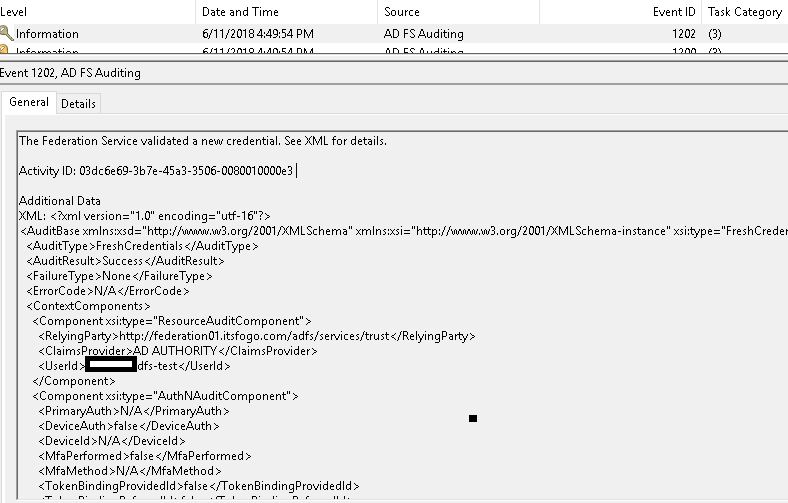
I conducted a complete testing process to ensure users could log in using our test Active Directory (AD) credentials. Also, Verified that the SAML assertions were correctly passed to the application.
I involved some of our team members from the testing team to test the other scenarios, such as password expiration, account lockout, and multi-factor authentication (MFA).
The proof of concept was successful, confirming that ADFS could handle the authentication needs of the custom application.
User acceptance test(UAT)
All the necessary documents and information were provided to the client to confirm the proof of concept and ensure the client was happy with the setup and followed the instructions. Once they are satisfied with POC, the preparation starts to set this up in the client staging environment.
Even though we had POC with almost similar environments, our client did not find it easy to replicate the process. The POC was done on one server, but the clients with 30K employees have a different infrastructure. Through continuous communication with the team client to follow the right steps and fine-tune the SAML configuration, the client was able to establish a connection to our staging application.
Going Live
The go-live process was a critical phase, and we took several steps to ensure a smooth transition:
Pre-Launch Checks
Verified that all servers were configured correctly and synchronized.
Conducted a load test to ensure the ADFS farm could handle the expected traffic.
Launch Day
Monitored the ADFS servers and WAP servers closely for any performance issues.
Provided real-time support to the client’s IT team to address any user login issues.
Keeping all stakeholders informed about the process to minimize confusion.
Post-Launch
Collected feedback from users and addressed any concerns.
Monitored system performance and made adjustments as needed.
Implementing ADFS for a client with 30,000 employees was a challenging but rewarding experience. By following a structured approach—from the PoC to the live implementation—we ensured a seamless transition to SSO for their custom application. Thorough testing during the PoC and pre-launch phases eliminated most of the obsrtucle and ensured a smooth go-live. The success of the project depended on careful planning, thorough testing, and effective communication.
For organizations considering ADFS, this experience demonstrates that it is a reliable and scalable solution for enabling SSO in a Microsoft environment. With the right preparation and execution, ADFS can significantly enhance both security and user experience.
After the Choice Platform became available in high street shops (Introducing GiftChoice for Ultimate Gift Card Experience – A Product I am Proud to Lead), it was only a matter of time before it became a target for scammers. It was 4 AM in the USA, and I was in deep sleep enjoying my holiday when my phone buzzed with a message from my lead developer. Something wasn’t right. Our analytics showed that we were issuing more vouchers than actual sales—which meant only one thing: either we were doing something wrong, or we were being scammed!
I jumped out of bed and called my team. After investigating, we found out how the scammers were pulling it off, and honestly, I had to admire their creativity.
How the Scam Worked
Here’s what they were doing:
They’d load up their shopping basket with groceries and4-5 GiftChoice cards.
At the checkout, they made sure the cashier scanned the gift cards first—activating them in our system.
While the cashier scanned the other items, they quickly scratched the gift cards, got the voucher codes, and redeemed them online immediately.
Within seconds, they received their preferred retailer gift card in their email.
Then, they’d pretend they “forgot their wallet” and ask to cancel the purchase.
The cashier could cancel the groceries but not the gift cards because they had already been redeemed.
And the end result? We were losing money by sending them gift cards without a sale.
A Quick Fix at 4 AM
We needed a complete solution, but a clean, fullproof solution required cooperation from retailers, payment processors, and our partners—which would take multiple days. But we couldn’t afford to lose money while waiting for a permanent fix.
So, I came up with a quick and simple hack:
➡️ Add a 30-minute delay before a card could be redeemed.
How This Stopped the Scam Instantly
When a cashier swipes the card, it gets activated in our system, and our redemption process checks if the card is active before processing it. I simply asked my team to add a rule that says a card must be activated for at least 30 minutes before it can be redeemed. Luckily, we managed to add this rule in a stored procedure that was quick to implement without any release procedure.
🚀 Result? The scammers were blocked immediately.
The best part? 99.99% of our real customers do not redeem their gift cards right after buying them, so the delay didn’t affect them at all. But for scammers, it completely ruined their plan.
It wasn’t the most high-tech solution, but sometimes, the simplest ideas work best. This quick fix stopped the fraud overnight and saved us a ton of money. The scam on the Choice platform was a wake-up call, but it also showcased our team’s ability to think on our feet and act decisively under pressure.
Moral of the story? Even on holiday, always be ready to think on your feet.
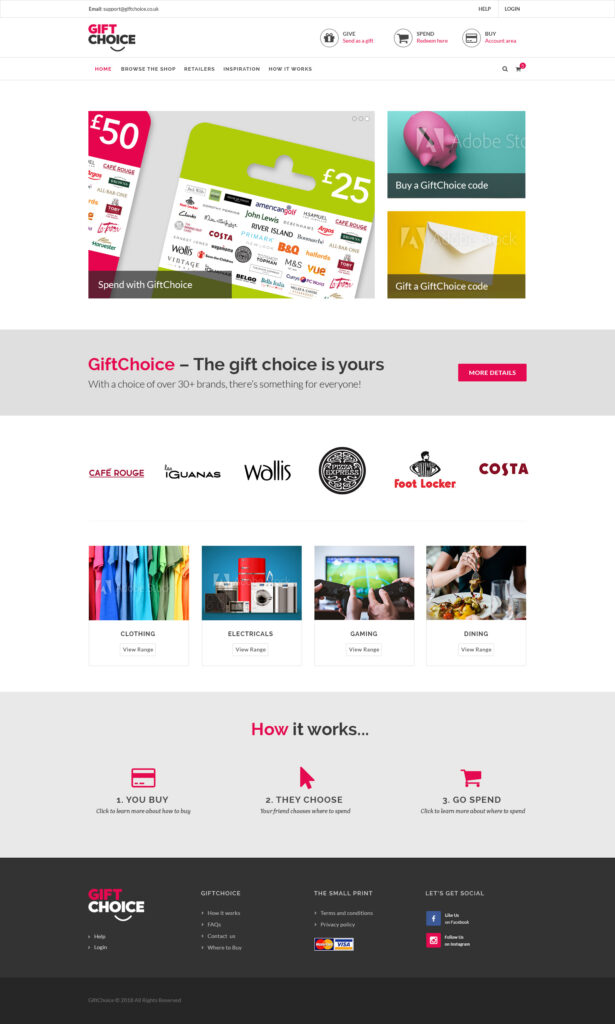
A couple of months ago, In November 2018, we proudly launched GiftChoice, the first product under the “Choice Platform” series by Intelligent Card Services. This is not an ordinary gift card. It is designed to give people the freedom and flexibility to use gift cards with multiple retailers. Traditionally, the gift cards are tied to a single retailer/brand. Gift choice breaks this tradition and allows you to choose any retailer you want.
I had the privilege of leading the engineering team to bring this product to life in just six months—a dream come true for us. I am delighted to share the story behind the GiftChoice card and how it’s changing how we think about gift cards.
The problem that we want to solve
If you’ve ever bought or received a gift card, you have probably faced this issue: most gift cards are tied to a single retailer. For example, if someone gives you a £25 Argos voucher, you can only spend it at Argos. What if you don’t want to buy anything from Argos? The card might sit in your wallet for months and go unused. This limitation has been a frustration for both gift receivers for years.
We saw an opportunity to fill this gap in the market. Why not create a gift card that the receiver can exchange with any retailer that they want? That’s exactly what we did with GiftChoice. Now, when you give someone a GiftChoice card, they can pick from 30 retailers/brands, ensuring the gift is both thoughtful and practical.
The Challenge
The GiftChoice plan came to me in April 2018. The goal was clear: launch the product by November 2018 to capture the Christmas market. With other companies working on similar products, it was a race to be first in the market.
But here’s the catch—we had just six months to design, develop, and deliver the product. Typically, a project like this would take a year or more. So, I had minimal time to think about it. I had a quick meeting with my team and decided it would be a huge challenge, which we are happy to take. Even though not everyone was 100% sure about completing the project by the launch date, I was confident with my team.
The Race Against Time
We had to move fast, but we also had to be innovative. After tirelessly working with the product and design teams, we finalised the physical card design and the function design of the platform. I set up two development teams spread across the UK and India and worked tirelessly to meet the tight deadline. I started one development team to work on setting up the framework of the project to cover the standard functions of an application. I also took the executive decision to use technologies like ASP.NET, Angular, and SQL Server, which our team was already familiar with, to speed up the process and to keep it simple. Also, decided to use a SAAS (Software as a Service) model, which allowed us to create a flexible platform that could support multiple “Choice” series in the future. The plan was to use each choice card as a client and have their own branding.
Once the functional design was ready, my idea was to prepare the customer-facing product first. This meant that some of the back-end processes, like automating voucher deliveries and setting up customer ticketing systems, would be developed after the initial launch. It was a bold move, but it paid off. After tirelessly working with my team (and a pregnant wife), GiftChoice went live in mid-November 2018 and was ready for the holiday season. Currently, the GiftChoice cards are available to purchase from every Sainsbury’s and Argos in the UK.
How GiftChoice Works
Here’s a simple breakdown of how GiftChoice works:
Purchase the Card: You buy a £25 GiftChoice card from Sainsbury’s, Argos, or our website.
Activate the Card: When the cashier swipes the card at the till, it gets activated by calling our API.
Scratch and Reveal: You scratch the card to reveal a unique voucher code.
Visit Our Website: Go to the GiftChoice website and enter the voucher code to exchange or redeem.
Choose Your Retailer: Our system validates the code and lets you select one retailer from a list of 30.
Confirm Your Choice: Once you’ve chosen a retailer (e.g., Argos), you confirm your selection.
Receive Your Voucher: We mark the voucher as redeemed and instantly email you a £25 Argos voucher that you can use in-store or online.
What’s Next for GiftChoice?
We plan to launch Style Choice, Social Choice, and Grocery Choice in 2019, each catering to different interests and lifestyles.
We are also expanding our reach. The first batch of GiftChoice cards is already available at Sainsbury’s and Argos, and we plan to make them available at most high-street retailers over the next two years.
Currently, we are using a stock of vouchers from each retailer, but we’re working on something even more significant. Our next project involves connecting directly to retailer APIs to generate vouchers on demand. This will eliminate the need for stock management where possible and make the process even more seamless.
Launching GiftChoice in just six months was one of the toughest challenges of my career, but it was also one of the most rewarding. Seeing the product on the high street shelves makes me proud. A big big salute to all the members of the product, design and development team who made this possible. Especially the development team, who worked a lot of weekends without any additional benefits to finish the product on time. That is where I see the value of team bonding and the passion for completing a challenge kicked in. The development team that I set up were ready for any challenge, and they delivered. And this is just the beginning. With more “Choice” platforms on the horizon, we’re excited to continue innovating and bringing even more flexibility to gifting.
So, the next time you plan to buy a gift card for someone, consider purchasing a GiftChoice card.
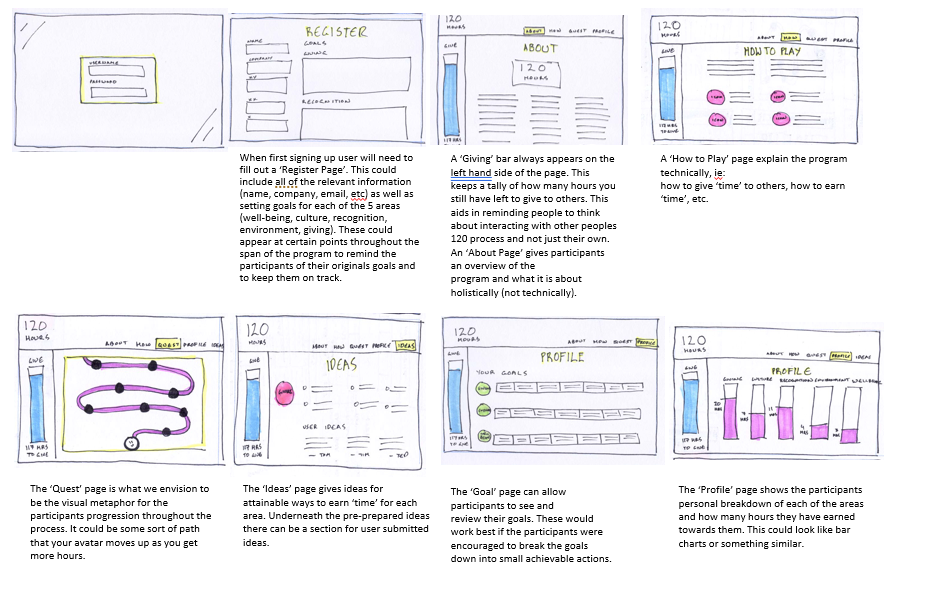
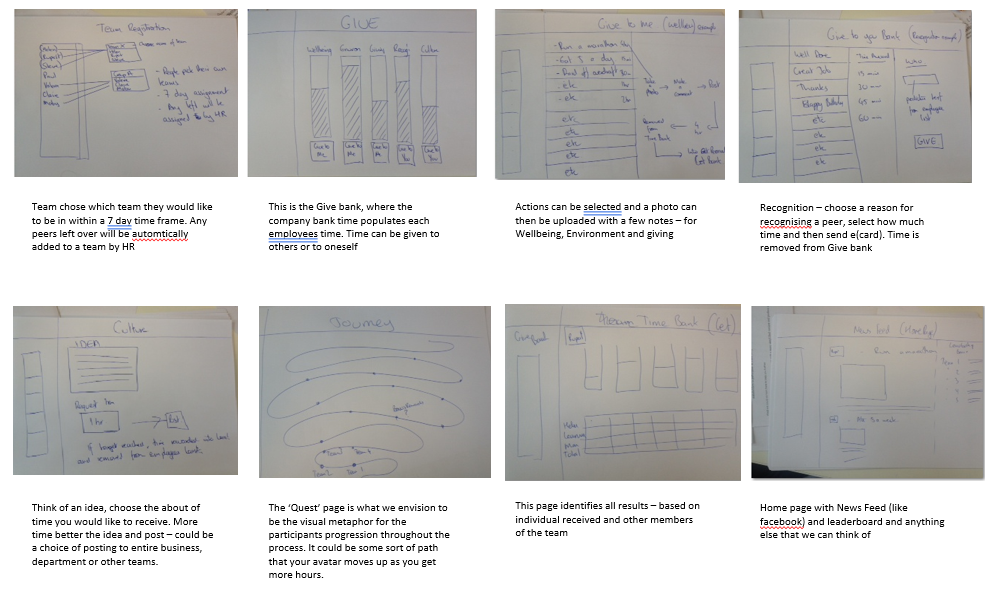
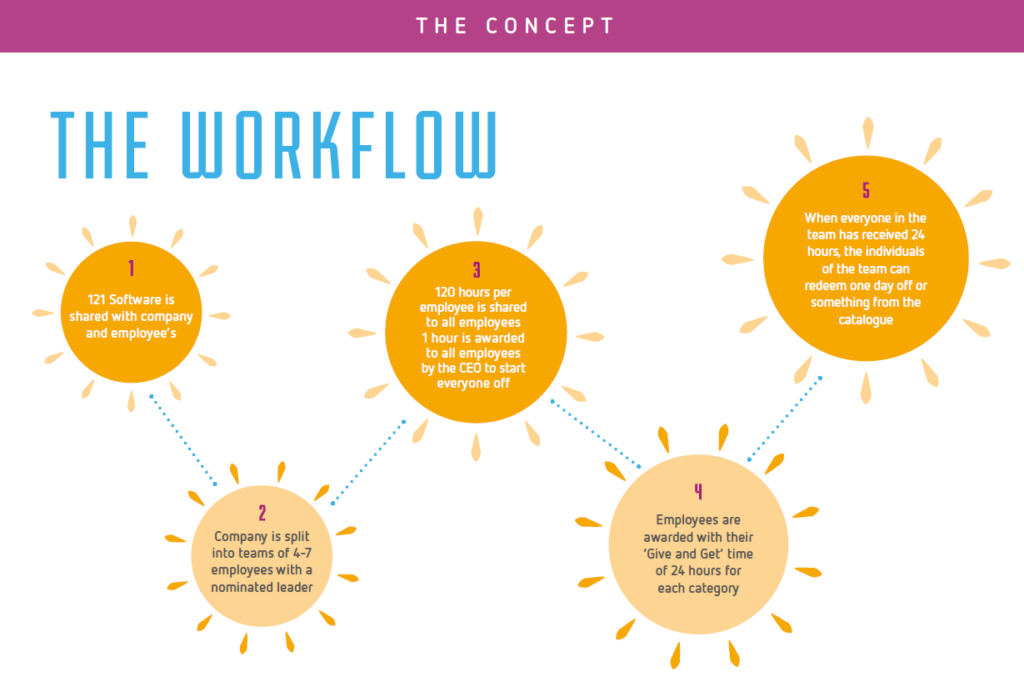
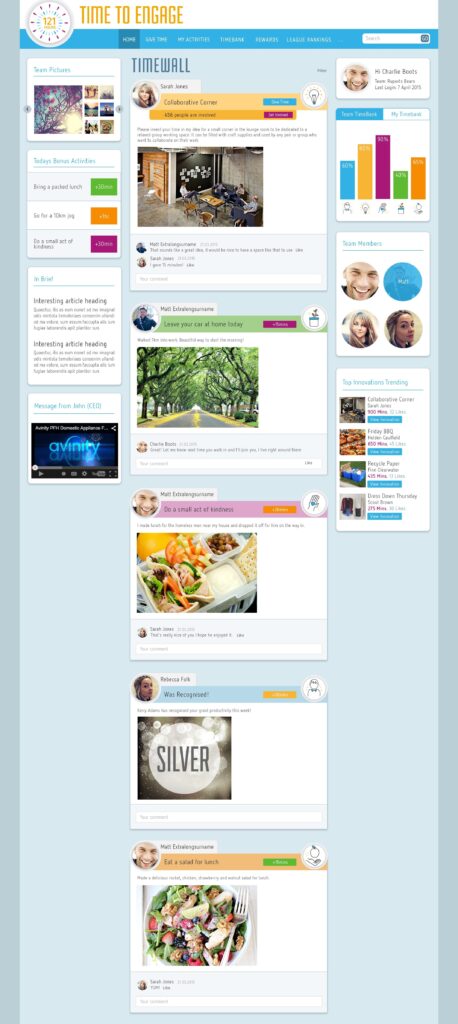
Every great project starts with an idea, and for us, it all began with our CEO’s vision. The leadership team recognized the need to boost employee engagement and create a more connected workplace. The idea was simple yet powerful—encourage employees to invest time in meaningful activities and reward them for their efforts. After the initial brainstorming sessions, the concept took shape. We initially called it 120 Hours, but it changed to 121 Hours at the end.
Phase 1: Defining the 120-Hour Concept
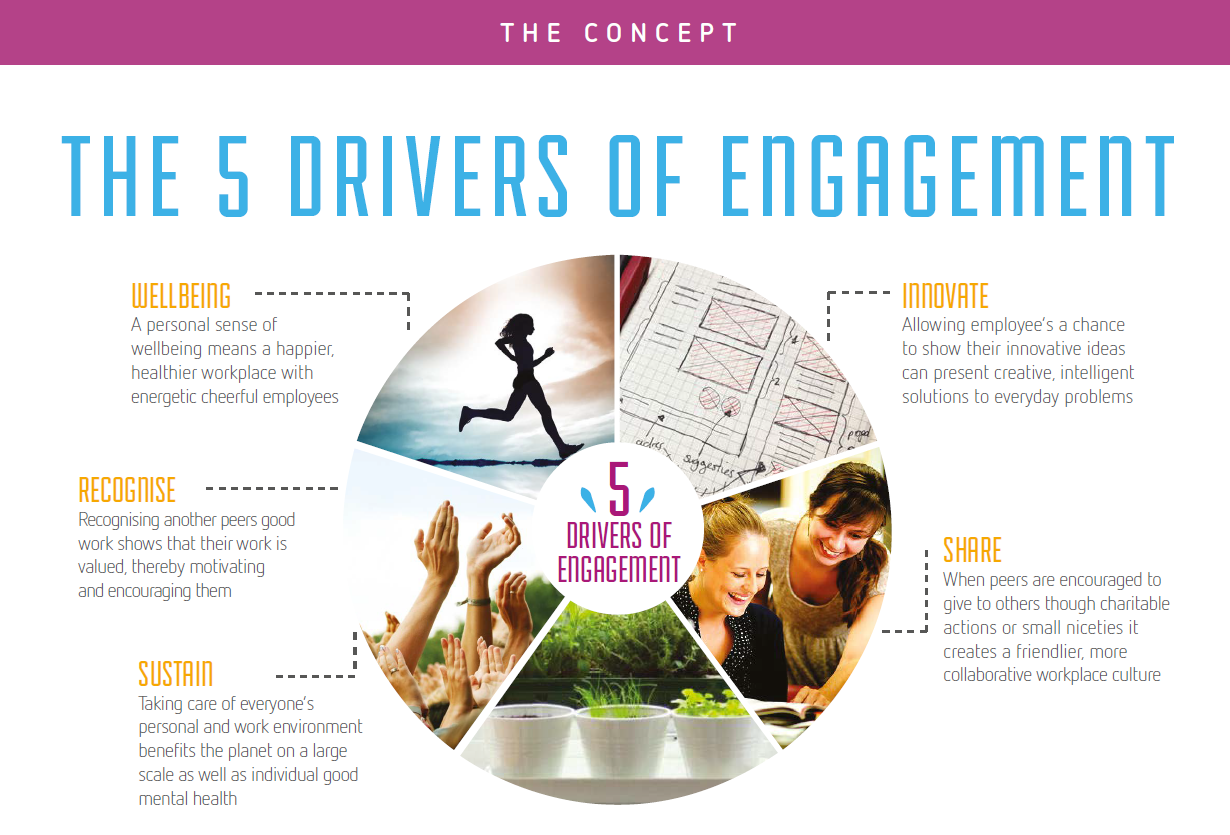
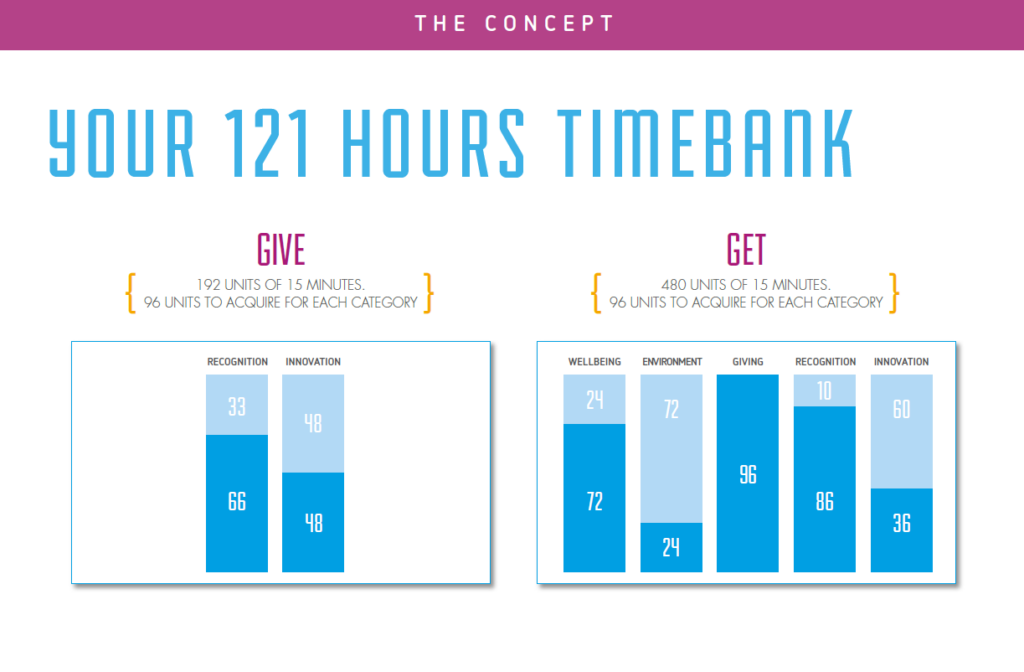
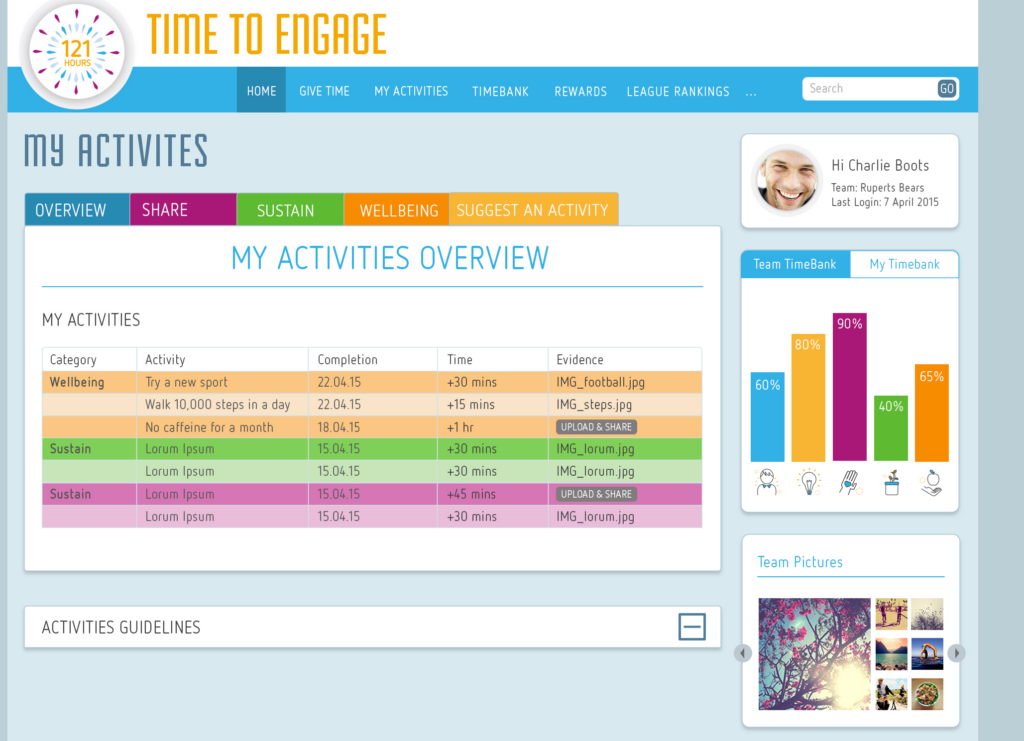
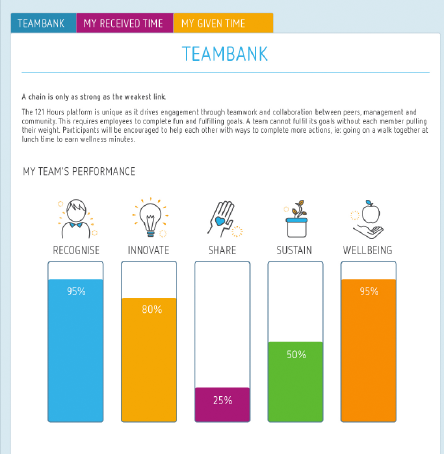
The core idea of 120 Hours was to encourage employees to accumulate 120 hours of engagement in a year across five key categories:
Wellbeing – Activities focused on mental and physical health.
Innovate – Contributions towards innovative solutions within the company
Recognize – Acknowledging and appreciating fellow employees’ efforts.
Share – Sharing knowledge and expertise through mentoring or training.
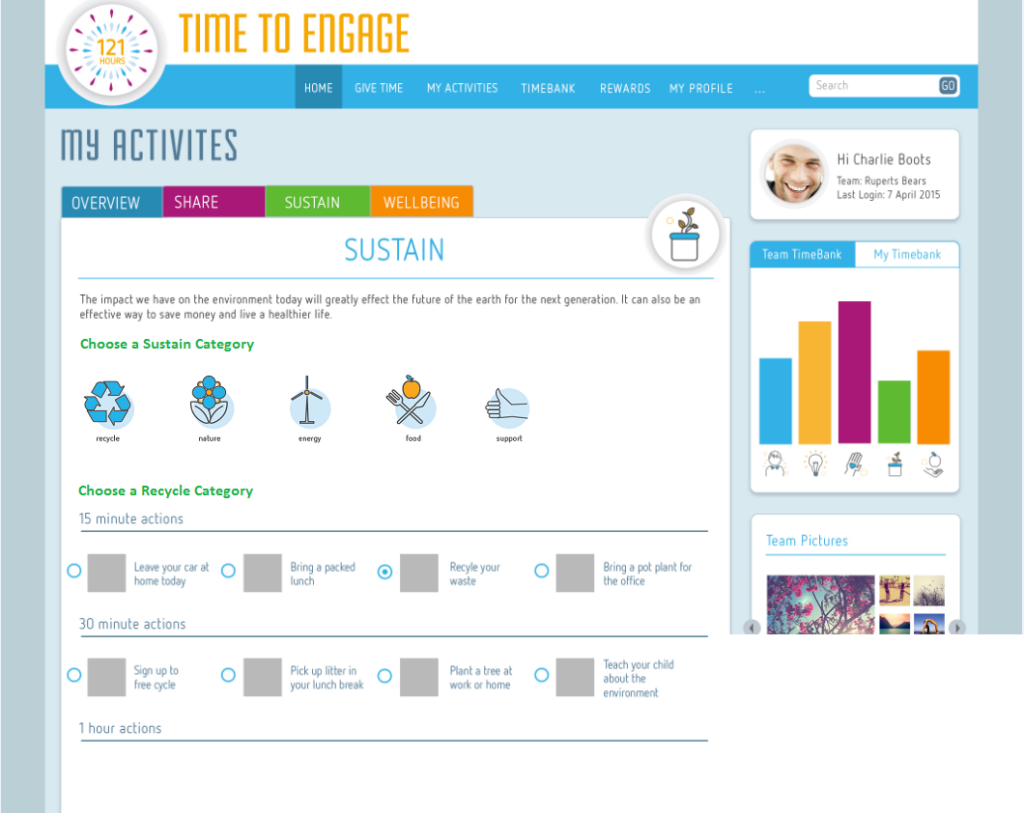
Sustain – Efforts to promote sustainability and corporate responsibility.
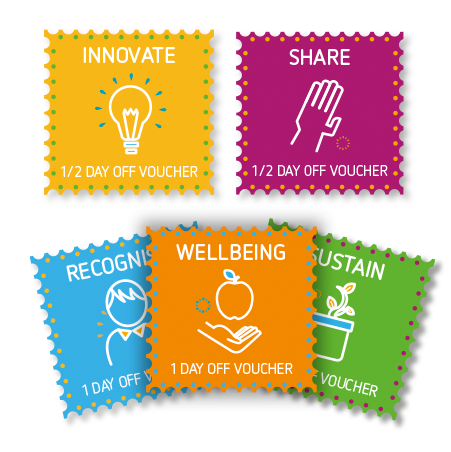
At the end of the year, employees would be rewarded for their participation in these activities. Their collected hours would be converted into additional leave days, with a maximum of five extra days off per year based on their level of engagement. This provided both motivation and a tangible benefit for employees who actively contributed to company culture.
Phase 2: Expanding the Vision to 121 Hours
After receiving initial feedback, the leadership team decided to take the concept a step further. The project evolved into 121 Hours, adding one extra hour—the Chairman’s Award. This prestigious hour would be granted at the chairman’s discretion to recognize employees who had made an outstanding impact throughout the year.
With this refined vision, we moved forward into the next crucial phase: turning the idea into reality.
Phase 3: Planning and Analysis
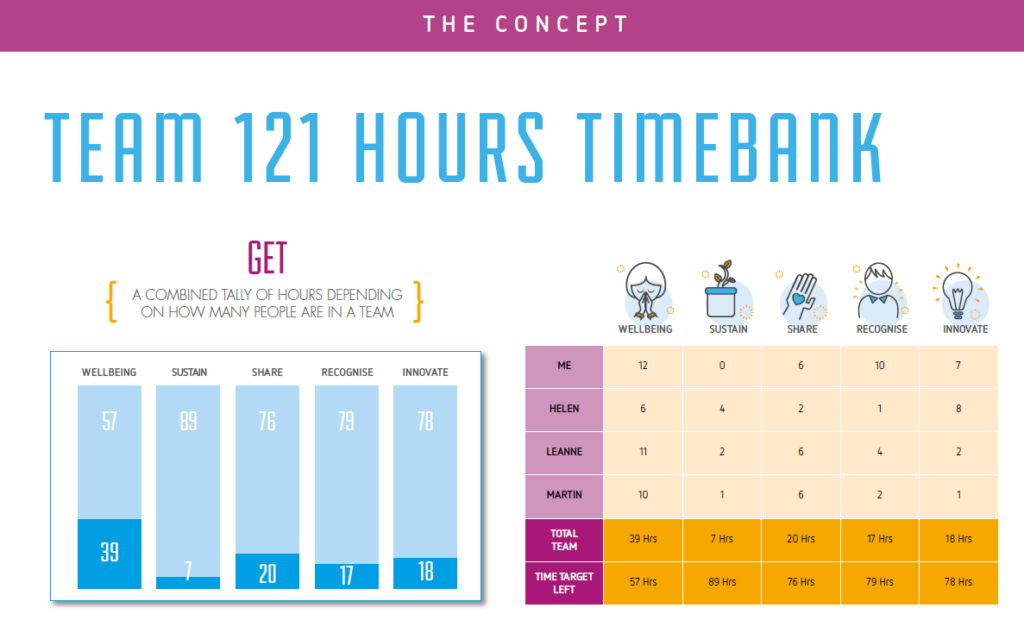
With the concept finalized, the next step was to translate the idea into a tangible solution. A cross-functional team was assembled, including HR professionals, IT specialists, and project managers, to plan and analyze the requirements. Key considerations included:
Scalability: Ensuring the platform could handle a large number of users and adapt to future enhancements.
User Experience: How employees get their hours, track progress, and view rewards.
Categories and Scoring: Defining the criteria for each category and ensuring a fair and transparent scoring system.
Reward Mechanism: Automating the conversion of hours into leave days and integrating it with the company’s HR system. Employees who have achieved their time bank can redeem their reward for extra time off or for category-related rewards.
Phase 4: Architectural and Functional Design
Once the planning and analysis phase was complete, the team moved on to designing the system. The architectural design focused on creating a robust, secure, and scalable web application. Key components included:
User Interface (UI): A clean, intuitive dashboard where employees can log activities, track progress, and view rewards.
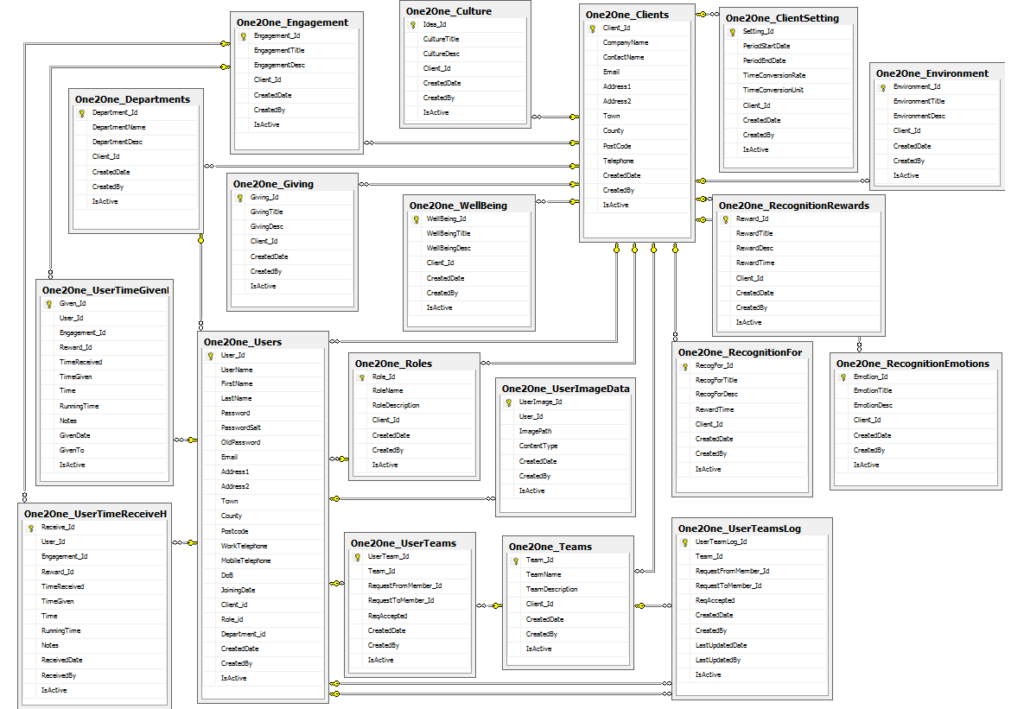
Backend System: A database to store employee data, activity logs, and reward calculations.
Integration: Seamless integration with the company’s existing HR and leave management systems.
Security: Ensuring data privacy and compliance with company policies and regulations.
Progress Tracking: Real-time tracking of hours collected, with visual progress bars and notifications.
Reward Calculation: Automatic conversion of hours into leave days, with a cap of 5 days per year.
System Architecture – Creating a scalable platform that could handle user submissions, approvals, and tracking.
Functionality Planning – Defining core features such as: Employee dashboards to track hours. A submission and approval workflow. Automated reward calculation and leave allocation. Reporting and analytics for HR teams.
This phase was crucial in ensuring a seamless user experience before moving into development.
Phase 5: Development, Testing and Implementation
With the designs approved, the development team began building the web application. Agile methodologies were employed to ensure flexibility and timely delivery. Key milestones included:
Prototype Development: A basic version of the application was created for testing and feedback.
Iterative Improvements: Based on feedback from HR and employees, the application was refined and enhanced.
Testing: Rigorous testing was conducted to ensure the application was bug-free and met all functional requirements.
Training: HR teams and employees were trained on how to use the application effectively.
Phase 6- Launch, deployment and maintenance.
After months of development and rigorous testing, 121 Hours was successfully launched. The journey from concept to execution was filled with challenges, but through careful planning and collaboration, we built a successful employee engagement platform that not only benefited individuals but also strengthened our company’s values.
My Role as the Head of Technology – Leading from the Front
In the journey of transforming the “120 Hours” concept into the fully functional “121 Hours” web application, my role as the Head of Technology was multifaceted and dynamic. While it was challenging to define my role in a single sentence, as I was deeply involved in every phase of the project, my primary responsibility revolved around leading the technical vision, making critical decisions, and ensuring seamless execution across teams.
From the very beginning, I worked closely with the CEO, HR leadership, and other stakeholders to understand the core objectives of the program. My role was to translate the conceptual idea into a technically feasible solution. This involved asking the right questions, identifying potential challenges, and aligning the technical roadmap with the business goals.
The project required collaboration across multiple teams, including developers, designers, HR professionals, and project managers. As the Head of Technology, I acted as the central point of coordination, ensuring that every team was aligned with the project’s objectives. I facilitated brainstorming sessions, resolved conflicts, and kept everyone focused on delivering a high-quality product.
One of my primary responsibilities was to make critical technical decisions that would shape the application’s architecture and functionality. Some of the key decisions I led included Choosing the Tech Stack, Defining the Architecture, Prioritizing Features, Ensuring Security and Compliance, closely monitoring the development process, ensuring that the team adhered to best practices in coding, testing, and deployment.
In today’s globalized world, businesses often rely on web applications and services that operate 24/7 to serve customers and employees across different time zones. Ensuring the reliability and availability of these applications is critical to maintaining productivity and user satisfaction. For organizations with teams spread across regions like the UK, EU, and India, setting up a robust daily check process for servers and applications can provide a significant advantage.
To give the UK and EU teams a head start, I have introduced an early morning server check process handled by a dedicated tester based in India. This process ensures that potential failures in applications or services are identified and reported before the primary workday begins in Europe.
Why a Daily Early Morning Check Process?
The primary goal of this process is to proactively identify and resolve any failures or issues in the web application or servers before they impact users. Even the checking of blacklinsting an IP address that is used to send out email is also checked. By conducting these checks early in the morning (India time), the tester can provide a status report to the UK and EU teams at the start of their workday. This ensures that any critical issues are addressed promptly, minimizing downtime and disruption.
Key Components of the Process
Application Functionality: Ensure all critical features of the web application are functioning as expected.
Server Health: Monitor server performance, including CPU usage, memory, disk space, and network connectivity.
Service Availability: Verify that all dependent services (e.g., databases, APIs, third-party integrations) are operational.
Error Logs: Review application and server logs for any errors or warnings that may indicate potential issues.
Automated Testing Tools: Use tools like Selenium, Jenkins, or custom scripts to automate the testing of key application functionalities.
Monitoring Tools: Implement server monitoring tools like Grafana or AWS CloudWatch to track server health and performance.
Scheduled Scripts: Create scripts to run daily checks at a specific time (e.g., 6:00 AM IST) and generate reports automatically.
Assign Responsibilities
Tester in India: A dedicated tester or group of testers based in India will execute the daily checks, review automated reports, and perform manual verification if needed.
Selected Person in UK/EU: A designated team member in the UK or EU will receive the daily report and take necessary actions based on the findings. If the issues are not resolved by the team in the UK/EU, it will refer to the team in the USA.
Create a Standardized Reporting Template Develop a clear and concise report template that includes the Date and time of the check.
Summary of application and server status (e.g., “All systems operational” or “Issues detected”).
Details of any failures or errors.
Screenshots or logs for reference.
Recommended actions for the UK/EU team.
The report can be delivered via email, a shared dashboard, or a collaboration tool like Slack or Microsoft Teams.
Establish Escalation Procedures
Critical Issues: Define what constitutes a critical issue (e.g., application downtime, server crash) and establish a protocol for immediate escalation to the UK/EU team.
Non-Critical Issues: For less urgent issues, include them in the daily report with recommended actions for the team to address during their workday.
Feedback Loop: Regularly review the process with the UK/EU team to identify areas for improvement.
Refine Automation: Continuously update and refine automated scripts and monitoring tools to cover new features or address emerging issues.
Training: Ensure the tester in India is well-trained on the tools, processes, and escalation procedures.
Benefits of the Process
Proactive Issue Resolution: Early detection of issues allows the UK and EU teams to address them before they escalate, minimizing downtime and user impact.
Improved Collaboration: The process fosters collaboration between teams in different time zones, ensuring seamless handover and communication.
Enhanced Reliability: Regular checks and automated monitoring improve the overall reliability and performance of the application and servers.
Time Efficiency: Automation reduces manual effort, allowing the tester to focus on critical tasks and analysis.
Example Workflow
6:00 AM IST: Automated scripts and monitoring tools run daily checks on the application and servers.
6:30 AM IST: The tester in India reviews the automated reports, performs manual checks if needed, and compiles the daily status report.
7:00 AM IST: The report is sent to the designated person in the UK/EU team.
7-8:00 AM GMT: The UK/EU team reviews the report, prioritizes issues, and takes necessary actions.
Follow-Up: The tester in India follows up on any unresolved issues during their next check.
Implementing a daily early morning server and application check process, led by a tester in India, is a strategic approach to ensuring the reliability and availability of web applications for global teams. By combining automation, clear reporting, and effective collaboration, organizations can proactively address issues, minimize downtime, and provide a seamless experience for users. This process not only enhances operational efficiency but also strengthens cross-regional teamwork, making it a valuable addition to any organization’s workflow.
We all always talk about big projects and significant achievements. But sometimes, a small project can give you a lot of satisfaction if it is related to your passion. As a lifelong cricket enthusiast, I was thrilled when I was assigned a project that combined my passion for the sport with my professional expertise. The project was part of Specsavers’ marketing campaign in partnership with County Cricket, a historic competition that has been a cornerstone of English cricket for over 126 years. Specsavers, Britain’s largest optical retail chain, has been the main sponsor of this prestigious tournament and recently secured a four-year extension to their sponsorship. Our task was to revamp the competition’s fulfilment process, transitioning from a traditional, physical approach to a streamlined, digital solution.
The Challenge
Specsavers had initially planned to distribute competition prizes through physical letters and tickets. Winners would receive a printed letter notifying them of their win, along with instructions on how to redeem their tickets. While this approach had its merits, it was time-consuming, costly, and lacked the immediacy that modern consumers expect.
The Solution
I approached to provide a fresh, digital perspective that would enhance the customer experience, reduce costs, and ensure faster prize delivery.
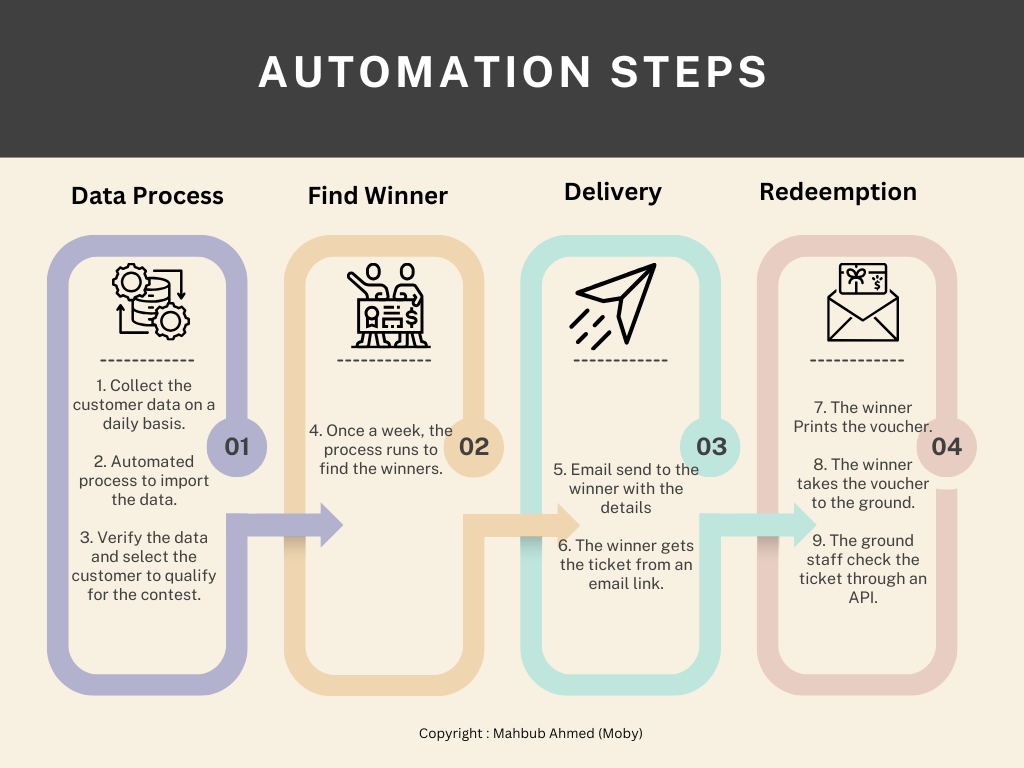
To meet Specsavers’ goals, I designed and implemented an automated digital process that streamlined the entire competition fulfilment journey. Here’s the step-by-step breakdown of how I transformed the process:
Step 1: Daily Data Import
The process begins with Specsavers sending us daily customer data to an SFTP location, including each participant’s favourite county cricket team. This data is the foundation of the competition, as it ensures that winners receive tickets to matches featuring their preferred teams.
Step 2: Automated Data Import
We developed an automated process for importing customer data into our database. This step eliminates manual data entry, reducing the risk of errors and ensuring that the data is processed quickly and efficiently.
Step 3: Data Verification and Qualification
Once the data is imported, we run an automated verification process to ensure its accuracy and completeness. For example, if a customer’s entry lacks an email address, it is flagged as invalid and returned to Specsavers for correction. This step ensures that only valid entries are included in the competition, maintaining the integrity of the process.
Step 4: Lottery Selection
After verifying the data, we run a lottery process to select the winner once a week. To keep it simple and under budget, this is done through an SQL job randomly selecting a row from the database. The randomness ensures fairness, while the automation ensures speed and efficiency.
Step 5: Winner Notification
Once a winner is selected, an automated email with a link to claim their ticket is sent to them. The custom email template, which includes a deadline for claiming the prize, was confirmed with the client, creating a sense of urgency. We used MailGun as our email management service to track the delivery rate and monitor how many users successfully claim their tickets, providing valuable insights for future campaigns.
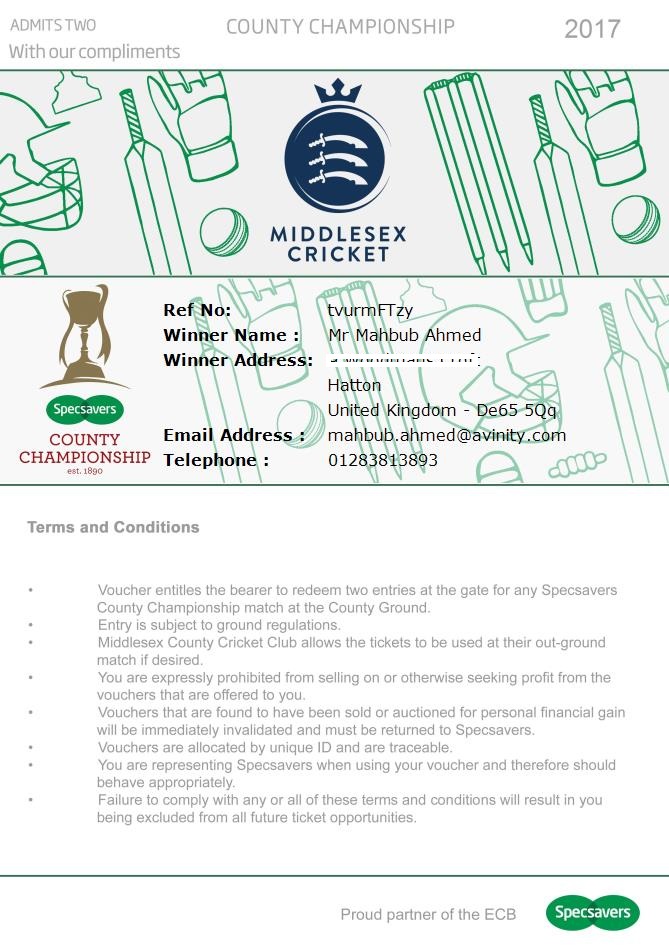
Step 6: Voucher Redemption
When the winner clicks the link in the email, they are directed to a digital voucher that admits two people to their selected county cricket ground. This digital approach eliminates the need for physical tickets, making the process faster and more convenient for the winner. A small ASP.net application was created to generate the voucher based on the user selection of the county.
Step 7: Voucher Printing
The winner prints the voucher at their convenience. This step ensures that they have a physical copy to present at the ground, while still benefiting from the speed and efficiency of the digital process.
Step 8: Match Day Entry
On the day of the match, the winner takes the printed voucher to the cricket ground. This step maintains the excitement and tradition of attending a live cricket match, while the digital voucher ensures a seamless entry process.
Step 9: Ticket Validation
On the ground, staff members validate the voucher using the reference number provided. This final step ensures that only legitimate winners gain entry, safeguarding the integrity of the competition. The same ASP.net application for step 6 was designed with an API interface to validate the ticket.
By moving from a traditional fulfillment approach to a fully automated digital process, we significantly improved efficiency and cost-effectiveness. The digital approach achieved an impressive 81% attachment rate, meaning 81% of winners successfully claimed their tickets. Eliminating physical mailing costs and manual intervention led to significant cost reductions for Specsavers.
This project was a perfect blend of my love for cricket and my passion for digital innovation. By automating the process, we not only enhanced the customer experience but also demonstrated the power of digital transformation in marketing campaigns. As Specsavers continues its partnership with County Cricket, this automated process can serve as a foundation for future initiatives, ensuring that fans can enjoy the thrill of the game with the convenience of modern technology.
In the world of web hosting, there is no shortage of tutorials and guides for hosting architectures. However, when it comes to applications based on Microsoft technology that require hosting in IIS, finding a decent, easy-to-follow architecture is surprisingly challenging. The goal is to provide a simple yet effective Windows hosting architecture that serves the purpose of medium-large-sized applications that require scalability and high availability. Depending on the number of users and scale of the application, the configuration can be hardware can be changed, but the architecture should remain the same.
To provide a clear and practical architecture that addresses the core components needed for a functional and reliable setup, the article is divided into 4 areas.
Network Configuration: To discuss how to set up a secure and efficient network infrastructure, including firewalls, load balancers, and DNS settings, to ensure smooth communication between servers and clients.
Web Server Setup: This section will focus on configuring a Windows-based web server (e.g., IIS – Internet Information Services) to host your applications, handle HTTP/HTTPS requests, and optimize performance.
Database Server: A robust hosting architecture requires a reliable database server. We’ll explore how to set up and manage a database server (e.g., Microsoft SQL Server) to store and retrieve data efficiently while ensuring security and scalability.
Backup and Data Recovery: No hosting architecture is complete without a solid backup strategy. We’ll walk through setting up automated backups, storing data securely, and implementing a recovery plan to minimize downtime in case of failures.
By the end of this article, you should have a clear understanding of how to build a simple yet effective Windows hosting architecture that meets your needs.
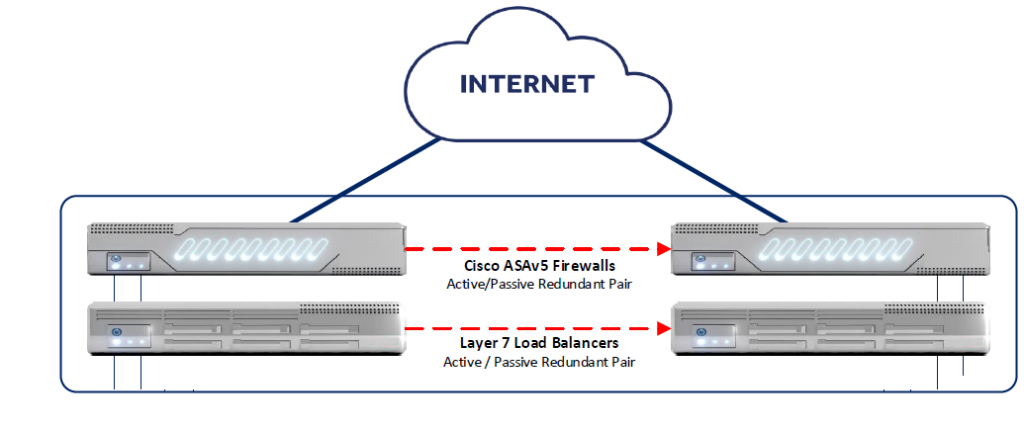
Network Configuration
A robust network infrastructure is the backbone of any hosting architecture. For a Windows-based hosting environment, ensuring high availability, security, and performance is critical. This is where a redundant pair of active/passive Cisco firewalls and a redundant pair of Layer 7 load balancers come into play. Redundancy is a key principle in designing a reliable hosting architecture. By implementing redundant pairs of firewalls and load balancers, you ensure that your network remains operational even in the event of hardware failures or unexpected issues. Let’s break down why these components are essential and how they contribute to a reliable hosting setup.
Redundant Pair of Active/Passive Cisco Firewalls
Firewalls are the first line of defense in any network, protecting your hosting environment from unauthorized access, malicious attacks, and data breaches. Yes, you can use a WAF or web application firewall for your application. Still, Hardware firewalls are physical devices that serve as a gatekeeper between the network and the external environment, managing traffic and providing security. For large-scale projects, it is better to use a proper firewall to ensure security.
Using a redundant pair of Cisco firewalls in an active/passive configuration ensures:
High Availability: If the active firewall fails, the passive firewall immediately takes over, ensuring uninterrupted protection and minimizing downtime.
Enhanced Security: Cisco firewalls are known for their advanced security features, including intrusion prevention systems (IPS), deep packet inspection, and VPN support, which safeguard your network from external threats.
Scalability: As your hosting needs grow, Cisco firewalls can handle increased traffic and adapt to more complex security requirements.
In an active/passive setup, one firewall actively manages traffic while the other remains on standby, ready to take over in case of a failure. This redundancy is crucial for maintaining uptime and ensuring business continuity.
Redundant Pair of Layer 7 Load Balancers
Load balancers are essential for distributing incoming traffic across multiple web servers, ensuring optimal performance and preventing server overload. Using a redundant pair of Layer 7 load balancers provides the following benefits:
Traffic Distribution: Layer 7 load balancers operate at the application layer, meaning they can make intelligent routing decisions based on content, such as URLs or cookies. This ensures that traffic is evenly distributed across your web servers, improving response times and user experience.
High Availability: Similar to the firewalls, a redundant pair of load balancers ensures that if one fails, the other can seamlessly take over, preventing service disruptions.
Health Monitoring: Layer 7 load balancers can monitor the health of your web servers and automatically route traffic away from any server that is down or underperforming.
SSL Offloading: By handling SSL/TLS termination at the load balancer level, you can reduce the computational load on your web servers, improving overall performance.
Web Server Setup
Once the network infrastructure is in place, the next critical component of your hosting architecture is the web server layer. For a scalable and high-performance Windows hosting environment, it’s recommended to use multiple web servers behind a load balancer. This setup ensures that your application can handle increasing traffic loads while maintaining high availability.
Load-Balanced Multiple Web Servers
Depending on your application load and requirement you can add from 2 to n number of the web server in this layer. You need to ensure that each web server is configured identically to maintain consistency in application behavior.
Here’s why this approach is beneficial:
Scalability: Adding more web servers allows you to scale horizontally, distributing the load across multiple machines. This ensures that your application can handle traffic spikes without performance degradation.
Fault Tolerance: If one web server fails, the load balancer will automatically route traffic to the remaining servers, ensuring uninterrupted service.
Performance Optimization: By distributing traffic evenly, you can reduce the load on individual servers, improving response times and overall user experience.
To implement this, configure your Layer 7 load balancer (discussed in the Network Configuration section) to distribute incoming HTTP/HTTPS requests across all available web servers.
IIS Synchronization for Code Deployment
One of the challenges of managing multiple web servers is ensuring that all servers have the same codebase and configuration. This is where IIS (Internet Information Services) synchronization comes into play. By synchronizing your web servers, you can ensure that any code or configuration changes made on one server are automatically replicated to the others. Here’s how to achieve this:
Shared Configuration: Use IIS’s shared configuration feature to store configuration files (e.g., applicationHost.config) in a central location, such as a network share or a cloud storage service. This ensures that all web servers use the same settings.
Web Deploy Tool: Microsoft’s Web Deploy Tool is a powerful utility that allows you to synchronize websites, applications, and content across multiple servers. When you release new code on one server, Web Deploy can automatically replicate the changes to all other servers in the farm.
Automated Scripts: For advanced setups, you can create scripts (e.g., using PowerShell) to automate the synchronization process. This ensures that code deployments are consistent and error-free.
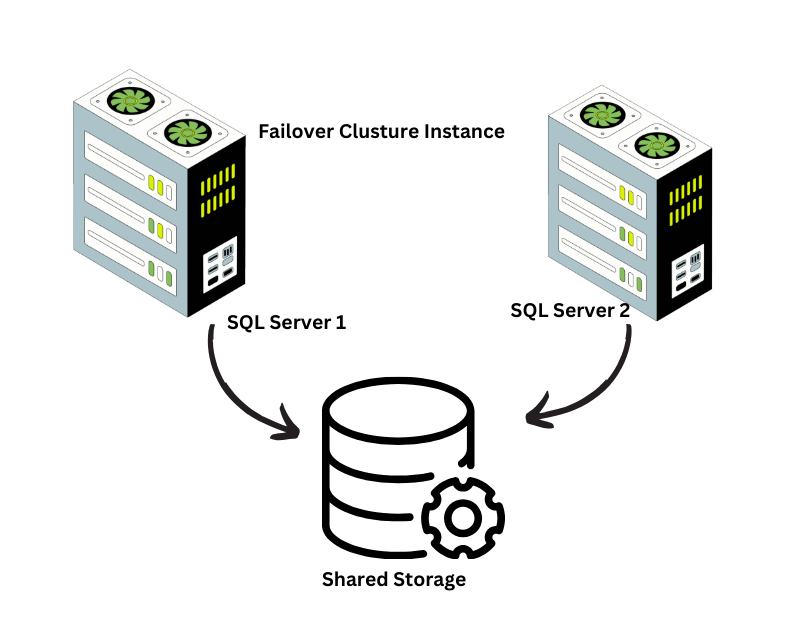
Database Server
The database is the heart of any application, storing and managing critical data. For a robust Windows hosting architecture, it’s essential to ensure that your database layer is both performant and highly available. There are a few options that you can choose from like Failover cluster, database mirroring, log shipping etc. But two Microsoft SQL Server instances in a failover cluster configuration, provide better redundancy and minimize downtime in case of failures.
Why Use a Failover Cluster?
A failover cluster is a group of servers that work together to provide high availability for applications and services. In the context of Microsoft SQL Server, a failover cluster ensures that if one database server fails, the other server automatically takes over, ensuring uninterrupted access to your data. Here’s why this setup is crucial:
High Availability: By using two SQL Server instances in a failover cluster, you eliminate single points of failure. If the primary server goes down, the secondary server takes over seamlessly, minimizing downtime.
Data Integrity: Failover clusters ensure that your data remains consistent and accessible, even during hardware or software failures.
Scalability: This setup allows you to scale your database layer as your application grows, without compromising on reliability.
Alternative to Failover Cluster: SQL Server Always On Availability Groups
While a failover cluster is a robust solution for high availability, it may not be the best fit for every scenario. For example, setting up a failover cluster requires shared storage and can be complex to configure and maintain. If you’re looking for a more flexible or simpler alternative, SQL Server Always On Availability Groups is an excellent option.
Always On Availability Groups (AGs) are a high-availability and disaster recovery solution introduced in Microsoft SQL Server 2012. They provide database-level redundancy by allowing you to group multiple databases into a single availability group and replicate them across multiple SQL Server instances. Here’s why AGs are a great alternative:
Database-Level Redundancy: Unlike failover clusters, which operate at the instance level, AGs work at the database level. This means you can replicate specific databases rather than the entire SQL Server instance, providing more granular control.
No Shared Storage Required: AGs do not require shared storage, simplifying the infrastructure and reducing costs.
Readable Secondaries: Secondary replicas in an AG can be configured as read-only, allowing you to offload read operations (e.g., reporting or analytics) to the secondary server, improving performance.
Automatic or Manual Failover: AGs support both automatic and manual failover, giving you flexibility in how you manage high availability.
When to Choose Always On Availability Groups Over Failover Clustering
Granular Control: If you only need high availability for specific databases, AGs are a better choice.
Cost Efficiency: AGs eliminate the need for shared storage, reducing infrastructure costs.
Read-Only Workloads: If you want to offload read operations to secondary replicas, AGs provide this capability out of the box.
Other Alternatives
Database Mirroring: An older high-availability feature that provides database-level redundancy. However, it’s deprecated in favor of Always On Availability Groups.
Log Shipping: A simpler solution for disaster recovery, where transaction logs are periodically shipped and applied to a secondary server. While it’s not as robust as AGs or failover clustering, it’s easier to set up and maintain.
Comparison Table
Feature
Failover Clustering
Database Mirroring
Log Shipping
Always On Availability Groups
Scope
Instance-level
Database-level
Database-level
Database-level
Failover
Automatic
Automatic/Manual
Manual
Automatic/Manual
Shared Storage
Required
Not required
Not required
Not required
Cost
High (Enterprise hardware)
Moderate
Low
High (Enterprise Edition)
Complexity
High
Moderate
Low
High
Readable Secondary
No
Yes (with limitations)
No
Yes
Deprecated
No
Yes (since SQL Server 2012)
No
No
Best Use Case
High availability
High availability
Disaster recovery
High availability + Disaster recovery
Dedicated Storage Layer for Backup
No hosting architecture is complete without a reliable backup and recovery plan. Data loss can occur due to hardware failures, software bugs, human errors, or even cyberattacks. To safeguard your data, it’s essential to implement a dedicated storage layer for backups, coupled with a comprehensive backup strategy.
Why a Dedicated Backup Storage Layer?
A dedicated storage layer for backups ensures that your data is securely stored, easily recoverable, and protected from accidental deletion or corruption. Here’s why it’s critical:
Disaster Recovery: In the event of a catastrophic failure, backups allow you to restore your application and data quickly, minimizing downtime.
Compliance: Many industries require businesses to maintain backups for regulatory compliance.
Data Integrity: Regular backups ensure that you can recover from data corruption or accidental deletions.
It is important to Maintain at least three copies of your data (primary + two backups), store them on two different types of media, and keep one copy offsite or in the cloud. Periodically test of your backups are very important to ensure they can be restored successfully.
Using Commvault for Backup
Commvault is a powerful enterprise-grade backup and recovery solution that provides a unified platform for managing backups across on-premises, cloud, and hybrid environments. Here’s how to leverage Commvault for your backup strategy:
Centralized Management: Commvault provides a single interface to manage backups for your entire infrastructure, including databases, web servers, and file systems. You can define backup policies, schedules, and retention periods from a centralized console.
Incremental and Differential Backups:
Commvault supports incremental and differential backups, reducing the amount of data transferred and stored during each backup cycle. This saves storage space and minimizes backup windows.
Application-Aware Backups:
For Microsoft SQL Server, Commvault offers application-aware backups that ensure transaction consistency and enable point-in-time recovery.
Cloud Integration:
Commvault supports backing up data to cloud storage providers like AWS, Azure, and Google Cloud, providing flexibility and scalability.
Automated Recovery Testing:
Commvault allows you to automate recovery testing, ensuring that your backups are valid and can be restored when needed.
Alternative Backup Solutions
If Commvault is not an option, there are other reliable backup tools and strategies you can consider:
Veeam Backup & Replication: A popular backup solution for virtualized environments, Veeam offers features like instant VM recovery, application-aware backups, and cloud integration.
Microsoft Azure Backup: If your infrastructure is hosted on Azure, Azure Backup provides a seamless and scalable solution for backing up VMs, SQL Server, and file systems.
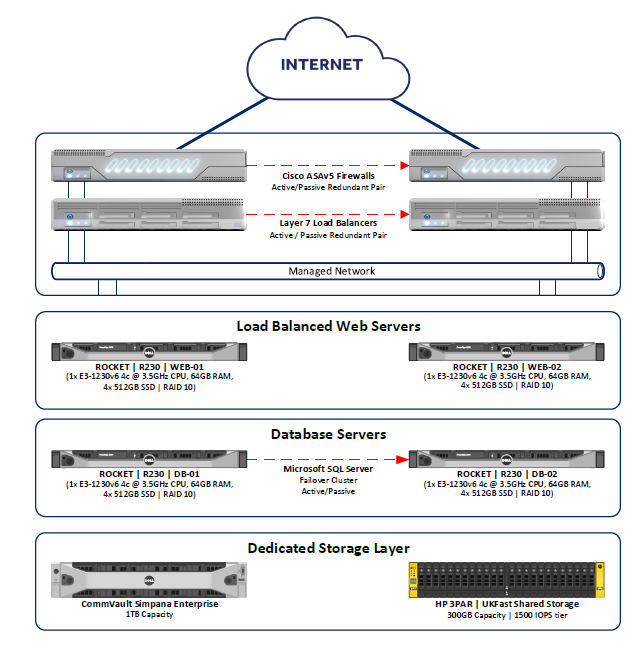
Here’s a quick recap of the architecture:
Redundant pair of Cisco ASAv firewalls (active/passive) for high availability and security. Redundant pair of Layer 7 load balancers to distribute traffic across web servers and ensure fault tolerance.
Multiple load-balanced web servers (e.g., IIS) to handle application traffic. IIS synchronization for seamless code deployment across servers.
Two Microsoft SQL Server instances configured in a failover cluster for high availability. Alternatively, SQL Server Always On Availability Groups for more granular control and flexibility.
Commvault Simpana Enterprise for centralized backup management and disaster recovery.
Below is a simplified diagram of the hosting architecture:
I was the Head of Engineering at a company that sold physical products. My job was to manage the engineering team, ensure our platforms were running well, meet the client, make all technical decisions, and meet deadlines. But one Christmas season, something unexpected happened that taught me a lot about leadership and teamwork.
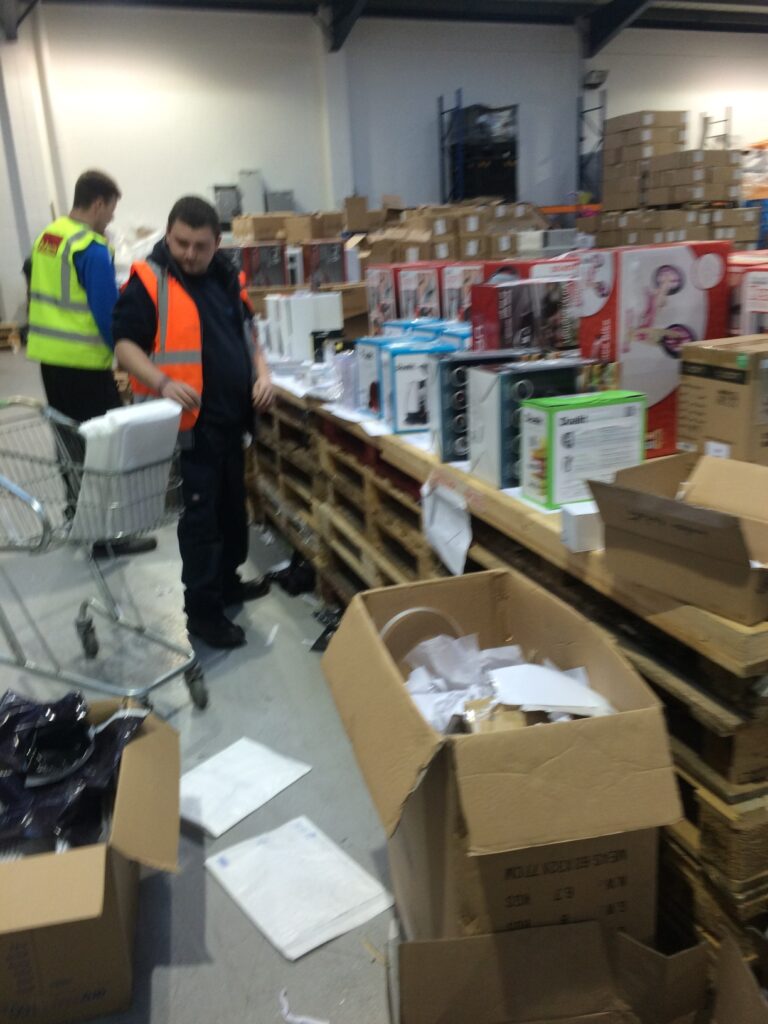
The holiday season was always busy for the company, especially the Christmas time, but that year was different. We had more orders than ever, and the warehouse didn’t have enough staff to handle them. Orders were piling up, and customers were waiting. It was a challenging situation, and the team in our warehouse was struggling. The day came when everyone realized that it was impossible to deliver all the goods that were promised to be delivered on time before Christmas. The HR team tried to get temporary warehouse staff to cover the situation, but they could not find enough people to handle it.
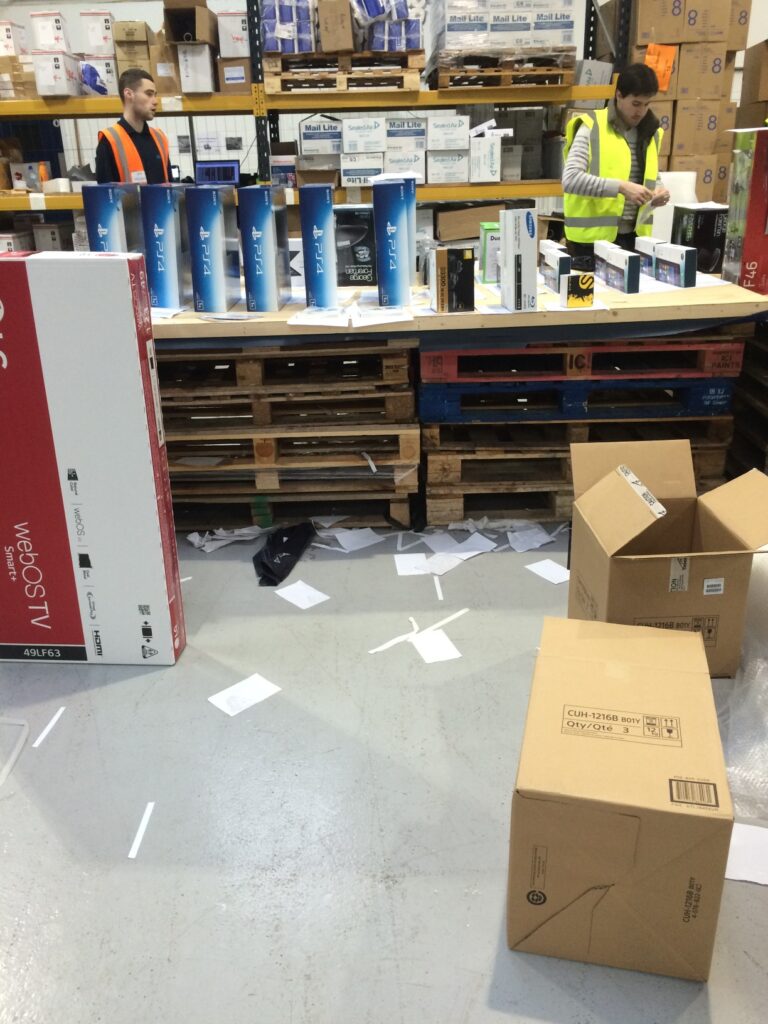
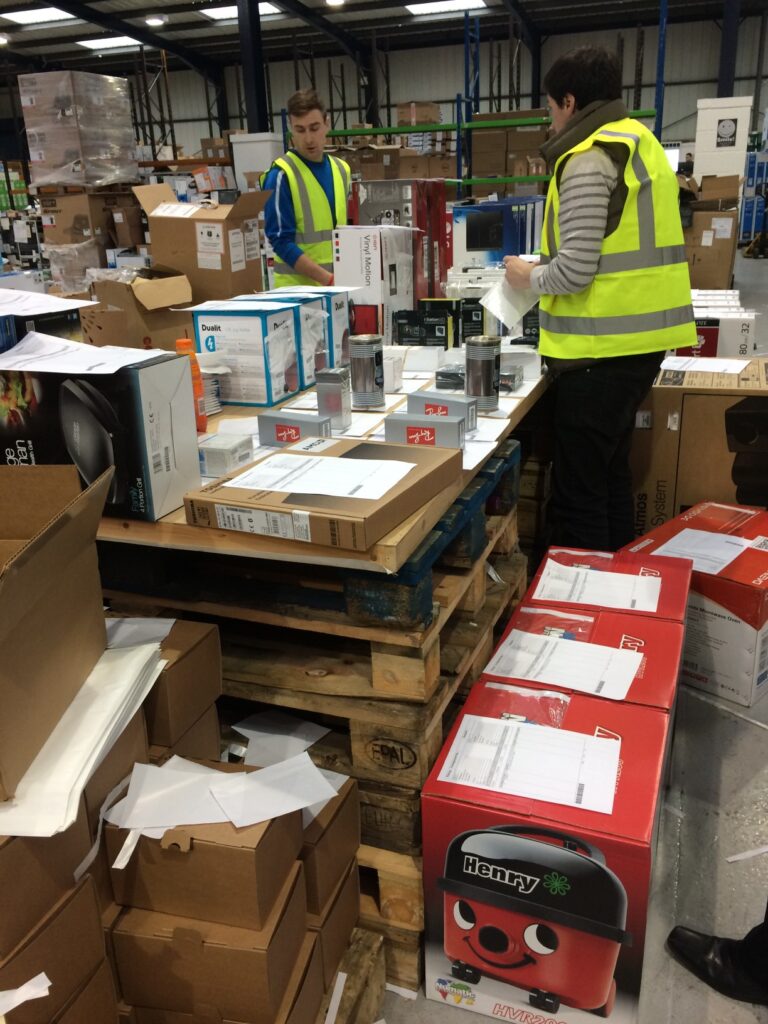
In this situation, the CEO sent out a message asking if anyone could spare some time to help the warehouse team. I decided to step in. After ensuring my engineering work was covered, I spent an entire week working in the warehouse.
At first, it felt strange. My usual work involved meetings, solving technical problems, and reviewing designs. Now, I was scanning the boxes, organizing products, printing the PO and putting them into the boxes. As we were not trained, we were not lifting or shifting, and we were doing most of the light work. But as the days went by, I became an important part of the delivery process. I learned a lot about the warehouse team’s work and how hard they worked to keep our customers happy. I also realized how little I knew about this part of the business before. Working with them gave me a new respect for what they did.
My decision to help had two big effects. First, it helped the warehouse team catch up on orders and meet customer deadlines. Second, it showed the rest of the company that no job was too small for anyone, no matter their position. It was a reminder that we were all on the same team, working toward the same goal. Even though I managed to break a couple of wine bottles and misplace a few items, the team highly appreciated my work.
But not everyone felt the same way. Some of my colleagues thought it was wrong to ask them to work in the warehouse. They felt it wasn’t their job and that their time was better spent on their own work. This surprised me, but it also showed that not everyone sees teamwork the same way. For some, stepping outside their role felt like a step-down. For me, it was a chance to lead by example and show that sometimes, you must do whatever it takes to help the team.
Looking back, that week in the warehouse was one of my best experiences in terms of teamwork. It taught me that leadership isn’t just about making decisions or managing people—it’s about being willing to do the hard work when it’s needed. It’s about understanding every part of the business and valuing everyone’s contribution. Most importantly, it’s about setting an example that inspires others to step up when times are tough.
Ultimately, we got through that busy Christmas season, and the company became stronger. But the real win was the lesson I learned: true leadership isn’t about your title or job description—it’s about action, understanding, and doing whatever it takes to help your team succeed.
I usually don’t write about physical products, as my enthusiasm lies in building software. However, I couldn’t help but be fascinated by a special promotional project I led last Christmas—the launch of Samsung’s The Frame 43” TV in partnership with Barclaycard. This wasn’t just any TV; it was a piece of art, both literally and figuratively.
At the heart of this promotion was the development of a custom web portal by my team and me that allowed Barclays customers to explore, order, and experience this exclusive product. So I should be excited about the technology I have used to create the web portal. But this time, I am rather excited about the idea of transforming a TV into an art piece.
The Project: A Unique Customer Incentive
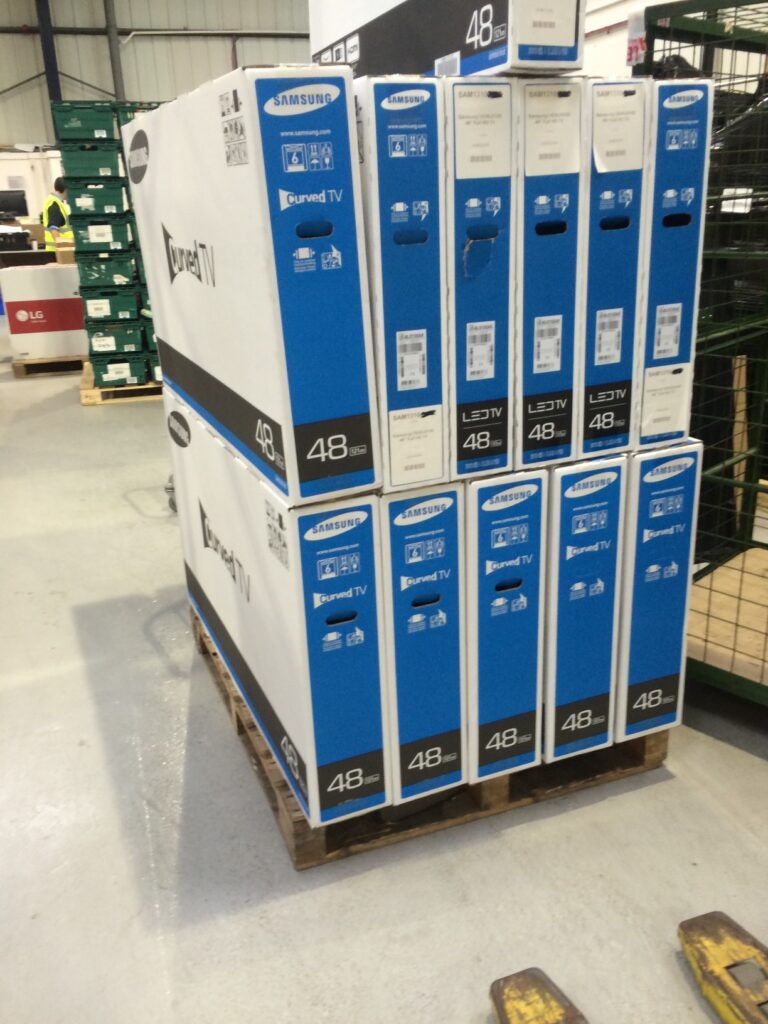
Samsung introduced The Frame 43” TV, which looks like a picture frame displaying stunning artwork when not in use. Barclaycard partnered with Samsung to offer a Special Edition version of this TV exclusively to its customers. This exclusive offer for The Frame 43” Television, with the Special Edition Porcelain Blue bezel was designed by acclaimed designer duo Scholten & Baijiings. Our engineering team was responsible for developing the e-commerce platform for this promotion, handling the order process seamlessly.
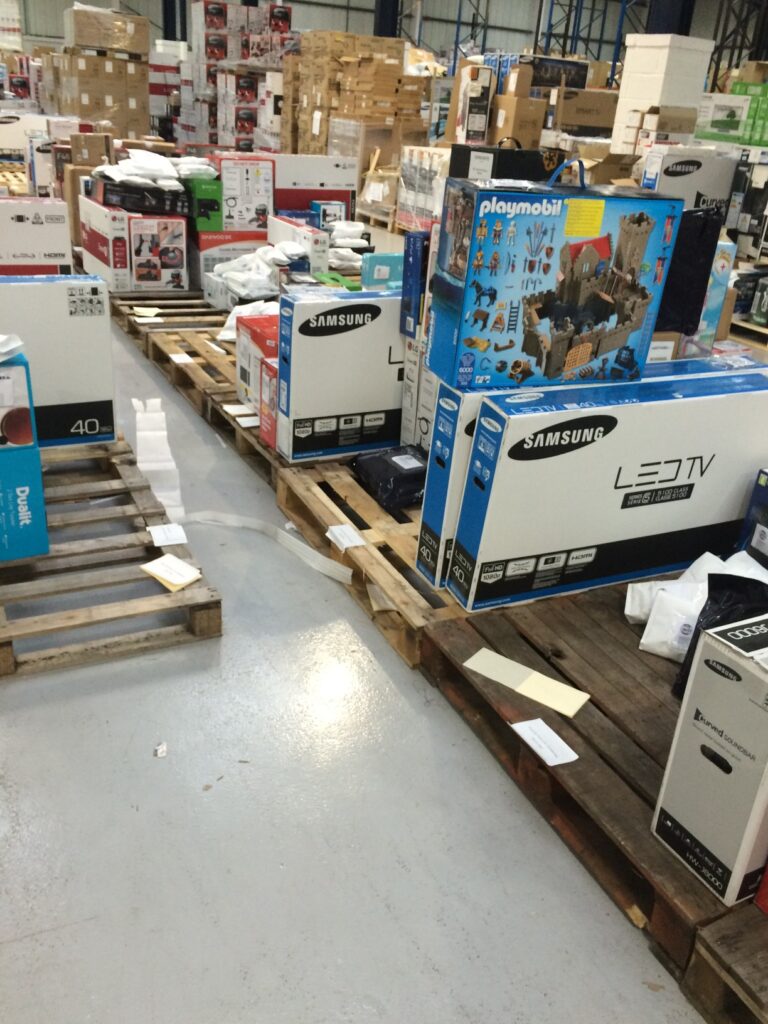
Also, as the dedicated supplier for this promotion, our company’s warehouse was filled with these exclusive TVs, and we even set up a studio space to experience the product firsthand. I made several visits to the warehouse myself to get a closer look—and I have to admit, I was impressed!
This is how we designed the Portal for them
What Makes This TV Special?
The Samsung The Frame 43” Special Edition comes with a unique Porcelain Blue frame bezel designed by award-winning studio Scholten & Baijings. This limited edition bezel was only available to Barclaycard customers during the promotion.
Hang it Like a Real Frame
One of the standout features of The Frame is its seamless design. It mounts flush against the wall, just like a real piece of art, making it an elegant addition to any space.
Enhance Your Space with Art Mode
When not in use, The Frame displays digital artwork, transforming your living room into a personal gallery. With its high-resolution display and rich colors, the artwork looks as authentic as a real painting.
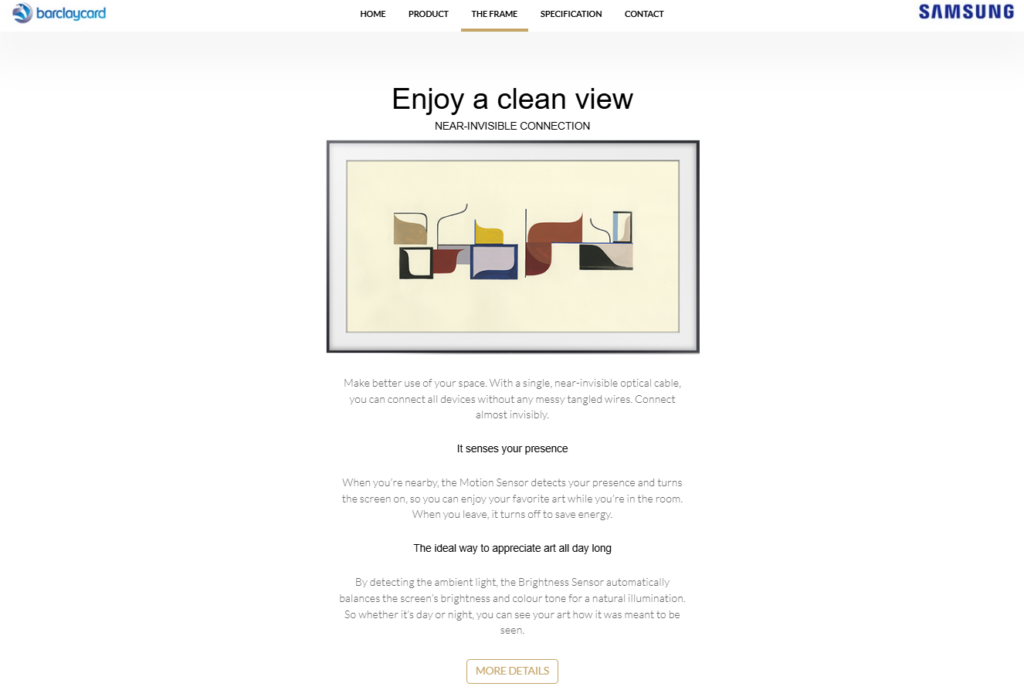
Minimalist Setup with Invisible Wires
One of my favorite aspects was the near-invisible optical cable that connects all devices. This eliminates clutter and makes the setup look clean and sophisticated.
Smart Sensors for a Smart Experience
The Motion Sensor detects when you enter the room and turns on the screen to display artwork. When you leave, it powers down to save energy. Meanwhile, the Brightness Sensor adjusts the display according to ambient light, ensuring that the artwork looks perfect at any time of the day.
From an engineering perspective, building a simple eCommerce platform for this campaign was not a very exciting challenge. But seeing the project come to life and watching customers receive their exclusive TVs was truly rewarding. This project reaffirmed my belief that technology, whether hardware or software, is at its best when it enhances our daily lives seamlessly. And sometimes, it’s okay to step out of your comfort zone and appreciate the beauty of a well-crafted physical product!